You’ll extend pavement life and cut repair costs by starting with thorough subgrade testing, correcting soft spots, and ensuring drainage. Pick the right base materials, place them in uniform lifts, and compact to spec. Use a mix tailored for climate and traffic, control mix and mat temperatures, and compact while the asphalt’s workable. Build clean joints and edges, set proper grades for drainage, and keep up with timely sealcoats and crack repairs — keep going to learn the specifics.
Key Takeaways
- Thoroughly evaluate and prepare the subgrade, removing organics, correcting soft spots, and achieving specified compaction and drainage.
- Choose and place a well-graded, adequately thick base with proper lifts, compaction, and edge restraints for load distribution.
- Use a climate- and traffic-appropriate asphalt mix design with correct binder content and aggregate angularity for durability.
- Control mix and mat temperatures, timing compaction within the optimal thermal window, and monitor with infrared thermometers.
- Implement regular preventive maintenance: seal cracks, maintain drainage, and apply sealcoat every 2–4 years to protect the surface.
Proper Subgrade Evaluation and Preparation

A stable subgrade is the foundation of any lasting asphalt surface, so you need to evaluate and prepare it thoroughly before paving. Start by performing subgrade soil testing to identify soil type, bearing capacity, and contaminants that could cause settling or frost heave. You’ll use results to decide compaction goals and necessary drainage improvements.
Conduct moisture content analysis alongside compaction tests; moisture dramatically affects density and load-bearing behavior, so don’t skip lab or field checks. Remove organic material and soft spots, then re-compact to specified densities with appropriate equipment, monitoring in-place moisture to avoid over- or under-compaction.
Where drainage is inadequate, install surface or sub-surface solutions to keep water away from the subgrade. Document all tests and corrective actions so you can verify compliance and support long-term performance.
Correct Base Material Selection and Installation
With the subgrade tested and stabilized, you’ll next choose and place base materials that will carry loads and protect the asphalt layer. You’ll evaluate base material types (crushed stone, recycled concrete, gravel, stabilized aggregate, and geotextile-reinforced mixes) by strength, drainage, and compaction behavior.
With the subgrade stabilized, select and place base materials—evaluate strength, drainage, and compaction for lasting pavement performance
Proper installation techniques matter: layer thickness, compaction effort, and drainage control dictate performance. Follow clear steps so the base supports traffic and resists frost.
- Specify material gradation and percent fines for expected loads
- Place uniform lifts, typically 4–6 inches, and compact each lift
- Use plate or vibratory rollers with specified passes and density targets
- Install edge restraints, subdrains, and geotextiles where needed
- Test in-place density and adjust moisture for ideal compaction
You’ll document material certifications and field test results. By matching base material types to site conditions and using disciplined installation techniques, you’ll create a stable foundation that extends pavement life.
Optimal Asphalt Mix Design for Intended Use
When you design an asphalt mix, pick aggregates with the right size distribution and angularity to support load and drainage.
You should also choose a binder type and content that match the climate and traffic—softer binders for cold, stiffer for heavy loads.
Balancing gradation and binder content will give you the durability and performance you need.
Aggregate Selection and Gradation
Grain size and shape determine how aggregates lock together and how the asphalt binder coats and binds — so choosing the right materials and gradation is critical to meet your pavement’s load, climate, and durability needs.
You’ll evaluate aggregate types and gradation effects to tailor mixes for traffic intensity and freeze-thaw cycles. Consider angular crushed stone for interlock or rounded gravels for workability; balance coarse and fine fractions for stability and void structure.
- High-strength coarse aggregate for load-bearing layers
- Well-graded mixes for reduced permeability and rutting resistance
- Fines to fill voids without causing segregation
- Durable, frost-resistant particles in cold regions
- Consistent source quality to guarantee repeatable performance
Select gradation to target density and long-term performance.
Binder Type and Content
Choosing the right binder type and content guarantees your asphalt mix performs under the loads, temperatures, and traffic it will face.
You’ll pick a binder grade based on climate and expected loading: softer binders resist low-temperature cracking, stiffer or polymer-modified binders resist rutting under heavy traffic.
Binder content must balance flexibility and stability; too little leads to raveling, too much causes bleeding and rutting.
Use performance-based specifications and tests to evaluate binder performance and adjust content for aggregate gradation and compaction targets.
Consider recycled materials carefully, since they alter viscosity and long-term binder durability.
Work with lab mix design and field verification to confirm the selected binder and content deliver constructability and long-term pavement performance for the intended use.
Accurate Grade and Slope for Effective Drainage
Because water follows the path of least resistance, you need precise grades and slopes to keep runoff moving away from structures and paved surfaces; even small deviations can cause pooling, pavement damage, or premature failure.
You’ll plan with slope analysis and proven drainage solutions so surface water never lingers. Establish design crowns, minimum slopes, and positive drainage lines before paving. Use stakes, laser levels, and GPS-guided milling to hit tolerances, and verify crossfall and longitudinal grades during compaction.
- Define target slopes (typ. 1–2% for parking, 2%+ where rapid drainage’s needed)
- Map low points and install drains or scuppers at collection zones
- Use slope analysis tools to model runoff paths and volume
- Check grades after compaction; correct deviations immediately
- Coordinate curbs, gutters, and adjacent grades to prevent reentry
Controlled Lift Thickness and Layering Practices
When you control lift thickness and layer sequencing, each asphalt course compacts uniformly and develops the intended density and strength. Keeping lifts within specified limits prevents poor bonding, thermal segregation, and premature rutting.
You’ll plan lifts so each layer matches the pavement design and traffic loads, using layering techniques that balance thickness, binder content, and temperature retention. Lift optimization means placing lifts thin enough for consistent compaction yet thick enough to be economical and structurally effective.
You’ll stagger joints and align layer seams to avoid weak planes, and you’ll monitor mat temperature to guarantee good interlayer adhesion without relying on excessive overlap. Inspecting underlying courses for cleanliness and proper tack application helps layers bond as intended.
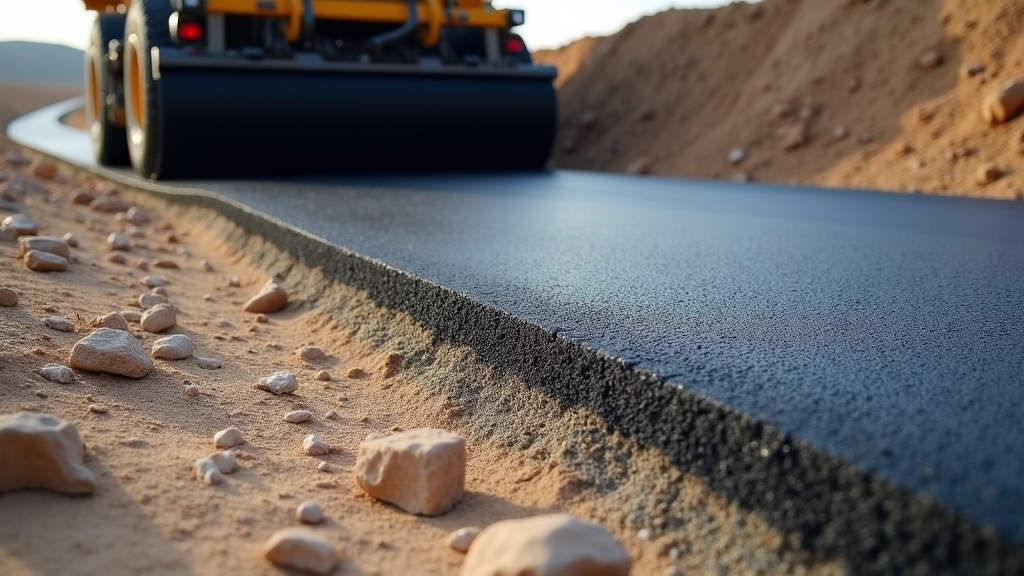
Thorough Compaction With Appropriate Equipment
Start compaction with a clear plan and the right machines so each lift reaches its intended density without wasted passes.
You’ll focus on matching roller type to mix and layer thickness, using vibration techniques judiciously to achieve uniform compaction without crushing aggregates.
Monitor mat temperature and adjust speed; do equipment calibration before shifts so amplitude and frequency settings deliver predictable results.
You’ll also sequence rollers—breakdown, intermediate, and finish—to avoid overworking or leaving weak spots.
- Choose roller type (steel, pneumatic, or combination) for the mix and lift.
- Set vibration amplitude and frequency based on material and thickness.
- Calibrate equipment daily to guarantee consistent compaction force.
- Control roller speed and pass overlap for uniform density.
- Measure in-place density and adjust technique immediately.
Quality Joint Construction and Edge Treatment
Clean, well-prepared joints and edges make the pavement act as a single, durable surface, so you should build them with attention to fit, alignment, and surface condition.
Clean, well-prepared joints and edges let the pavement act as one durable surface—built with fit, alignment, and good surface condition
You’ll cut clean vertical joints, remove loose material, and guarantee mating surfaces match so the seam transfers load without weak points. Compact the joint face and maintain straight alignment during paving to avoid offsets that trap water and promote raveling.
For transverse and longitudinal joints, use proper tack and controlled compaction to get interlock; then apply joint sealing to block moisture and slow oxidation.
At exposed edges, provide edge reinforcement—such as tapered base supports, steel edging, or compacted granular shoulders—to prevent edge drop and cracking under wheel loads. Finish edges with neat, dense asphalt and protect them during curing.
Inspect joints and edges before opening to traffic and re-seal or reinforce any defects promptly. Doing this reduces maintenance and extends pavement life.
Temperature Management During Placement and Compaction
You need to start with the correct mix temperature to guarantee proper binder workability and aggregate coating.
Keep monitoring ambient conditions so you can adjust mat temperature targets and paving speed as conditions change.
Time your compaction precisely while the pavement is still within its ideal temperature window to achieve required density.
Correct Mix Temperature
Maintaining the correct mix temperature during placement and compaction is critical because it directly affects workability, density, and long‑term pavement performance.
If the asphalt cools too quickly you’ll struggle to achieve proper compaction, and if it’s too hot you risk binder draindown and accelerated aging.
You need to control mix temperature effects through planning and real‑time temperature monitoring so each lift reaches target density without damaging the binder.
Follow clear steps on-site and train crews to respond to readings.
- Record mix delivery temperature at the paver
- Check mat temperature before initial compaction
- Adjust screed speed and rolling pattern to retain heat
- Use insulation or windbreaks for short holds
- Log and review temperature monitoring data after each shift
Ambient Condition Monitoring
Ambient condition monitoring during placement and compaction keeps you aware of air temperature, wind, humidity, and solar exposure so you can adapt operations to preserve mix temperature and achieve target density; monitor conditions continuously, set decision thresholds for delays or protective measures, and communicate readings to the crew in real time so compaction plans are adjusted before problems develop.
You’ll use portable thermometers, anemometers, and hygrometers to quantify ambient temperature effects and moisture level impacts on mix cooling and surface tack. Track trends, not just snapshots, so you spot rapid cooling or moisture spikes that can compromise interlayer bonding.
When readings cross your thresholds, protect the mat with wind breaks, temporary covers, or spraying schedules, and keep crews informed so they respond quickly and consistently.
Controlled Compaction Timing
Because temperature controls how quickly a mat stiffens, timing your compaction steps to keep the mix within its target temperature window is critical to achieving density and bond.
You’ll plan compaction timing around mix temperature, ambient conditions, and equipment readiness so the mat’s viscosity allows proper deformation and interlock. Treat controlled factors—like haul speed, laydown rate, and roller patterns—as part of a coordinated sequence.
Monitor temperatures and adjust rollers so you don’t miss the compaction window.
- Check mix and mat temperatures immediately upon delivery.
- Stage rollers so each passes while the mat’s still workable.
- Adjust laydown speed when temperatures drop.
- Use infrared thermometers for real-time feedback.
- Document timing and conditions for quality control and future adjustments.
Timely Surface Treatments and Crack Repair
When you act quickly on surface treatments and crack repair, you stop small defects from becoming costly failures; timely sealcoating, patching, and crackfilling preserve structural integrity and extend pavement life.
You should prioritize surface sealing where water intrusion is likely, applying appropriate materials that bond to the asphalt and block moisture.
For linear gaps, use hot or cold crack sealing methods that match crack width and local temperatures; proper joint preparation and material selection keep seals flexible and durable.
Spot patching for potholes or undermined areas restores load distribution and prevents edge deterioration.
Spot patching potholes and undermined areas restores load distribution and stops edge deterioration before problems grow.
Schedule repairs seasonally so you work when surfaces are dry and temperatures suit the chosen products.
Inspect after storms and heavy traffic events to identify new damage early.
Keep records of treatments and materials so you can track performance and adjust techniques.
Regular Preventive Maintenance and Sealcoating
Regular preventive maintenance and timely sealcoating keep your pavement performing longer and reduce lifecycle costs by stopping minor wear before it becomes major damage.
You’ll extend pavement life when you schedule routine inspections, address surface issues early, and apply sealcoating at recommended intervals. Preventive maintenance slows deterioration, preserves structural integrity, and saves you money compared with major repairs.
You can visualize practical steps that make a difference:
- Inspect seasonally for cracks, pooling water, and edge breakdown
- Fill and seal cracks promptly to prevent water intrusion
- Apply sealcoating every 2–4 years to refresh binder and protect aggregates
- Maintain drainage and trim vegetation to avoid undermining pavement
- Schedule light overlays or patching before failures spread
Understand sealcoating benefits: it reduces oxidation, improves skid resistance, and provides a uniform surface that delays costly rehabilitation.
Be proactive—regular preventive maintenance plus targeted sealcoating keeps your pavement durable and cost-effective.
Frequently Asked Questions
How Do Municipal Regulations Affect Driveway Paving Permits?
Municipal regulations shape whether you can pave, forcing you to follow zoning laws and specific permit processes; you’ll submit plans, meet setback and drainage rules, pay fees, and undergo inspections before your driveway work’s approved.
Can Recycled Asphalt (RAP) Be Used in Structural Layers?
Yes — you can use recycled materials like RAP in structural layers, but you’ll need proper mix design, quality control, and testing to guarantee structural integrity, durability, and compliance with local specs and performance expectations.
What Warranties Should Contractors Provide for New Pavement?
You should require clear warranty coverage detailing materials, workmanship, and performance durations; expect contractor obligations for repairs, maintenance, and defect remediation, inspection timelines, and transferability. Ask for written terms, remedies, and dispute-resolution procedures up front.
How Does Nearby Heavy Tree Root Growth Impact Pavement Life?
Heavy tree root impacts shorten pavement life by heaving, cracking, and causing drainage changes; you should monitor root zones, schedule regular pavement maintenance, trim or remove problematic roots, and use barriers to limit future structural damage.
Are Permeable Asphalt Options Suitable for Cold Climates?
Yes — you can use permeable asphalt in a cold climate, but you’ll need proper design: frost-resistant base, good drainage, winter maintenance, and durable mixes to prevent freeze-thaw damage while preserving permeability and preventing clogging.
Final Thoughts
Long-lasting asphalt begins with precision — from careful subgrade testing to proper mix design, temperature control, and thorough compaction. Each step you take to ensure a strong foundation, correct lift thickness, and effective drainage pays off in reduced cracking, smoother performance, and lower repair costs over time. Add in timely sealcoating and crack repair, and you’ll extend your pavement’s lifespan while keeping it safe and attractive year-round.
At All Around Asphalt, we bring expert craftsmanship and advanced paving technology to every project we handle across Mahwah, NJ and surrounding communities. Whether you need residential asphalt paving, commercial paving solutions, or reliable asphalt resurfacing, our team ensures your surfaces are built for strength, appearance, and longevity.
When it’s time to upgrade or maintain your asphalt, contact All Around Asphalt or call 862-283-9101 for a free consultation. Let our experienced professionals help you implement the best paving techniques for durable, cost-effective results that stand the test of time.